Capturing the vibrant and dynamic world of graffiti requires more than just a keen eye; it demands an understanding of the right camera settings to bring out the best in these urban masterpieces. Graffiti, with its bold colors and intricate designs, offers a unique challenge to photographers. The interplay of light, shadow, and texture can make or break a shot. Therefore, mastering the camera settings is crucial to capturing the essence of graffiti art.
Understanding Graffiti Photography
What is Graffiti Photography?
Graffiti photography is the art of capturing street art in its natural environment. This form of photography not only documents the artwork but also tells a story about the culture and context in which it exists. Graffiti has a rich history, dating back to ancient civilizations, but it gained significant momentum in the 20th century with the rise of hip-hop culture.
Historical Context of Graffiti Art
Graffiti has evolved from simple tags to complex murals that can cover entire buildings. Understanding the historical context of graffiti helps photographers appreciate the art form and capture it more effectively. From the political messages of the 1960s to the vibrant street art of today, graffiti has always been a medium for expression and rebellion.
Essential Camera Settings
Aperture Settings
Aperture controls the depth of field in your photos. For graffiti photography, a wider aperture (lower f-stop number) can help isolate the artwork from the background, making it stand out. However, if you want to capture the entire scene, including the surroundings, a narrower aperture (higher f-stop number) might be more appropriate.
Shutter Speed
Shutter speed determines how long your camera’s sensor is exposed to light. For graffiti photography, a faster shutter speed can freeze motion and capture sharp images, especially in low-light conditions. Conversely, a slower shutter speed can create interesting effects, such as light trails, if you’re shooting at night.
ISO Settings
ISO measures the sensitivity of your camera’s sensor to light. In graffiti photography, it’s essential to balance ISO with aperture and shutter speed to avoid noise in your images. A lower ISO is preferable for bright conditions, while a higher ISO can be used in low-light situations.
Choosing the Right Lens

Wide-Angle Lenses
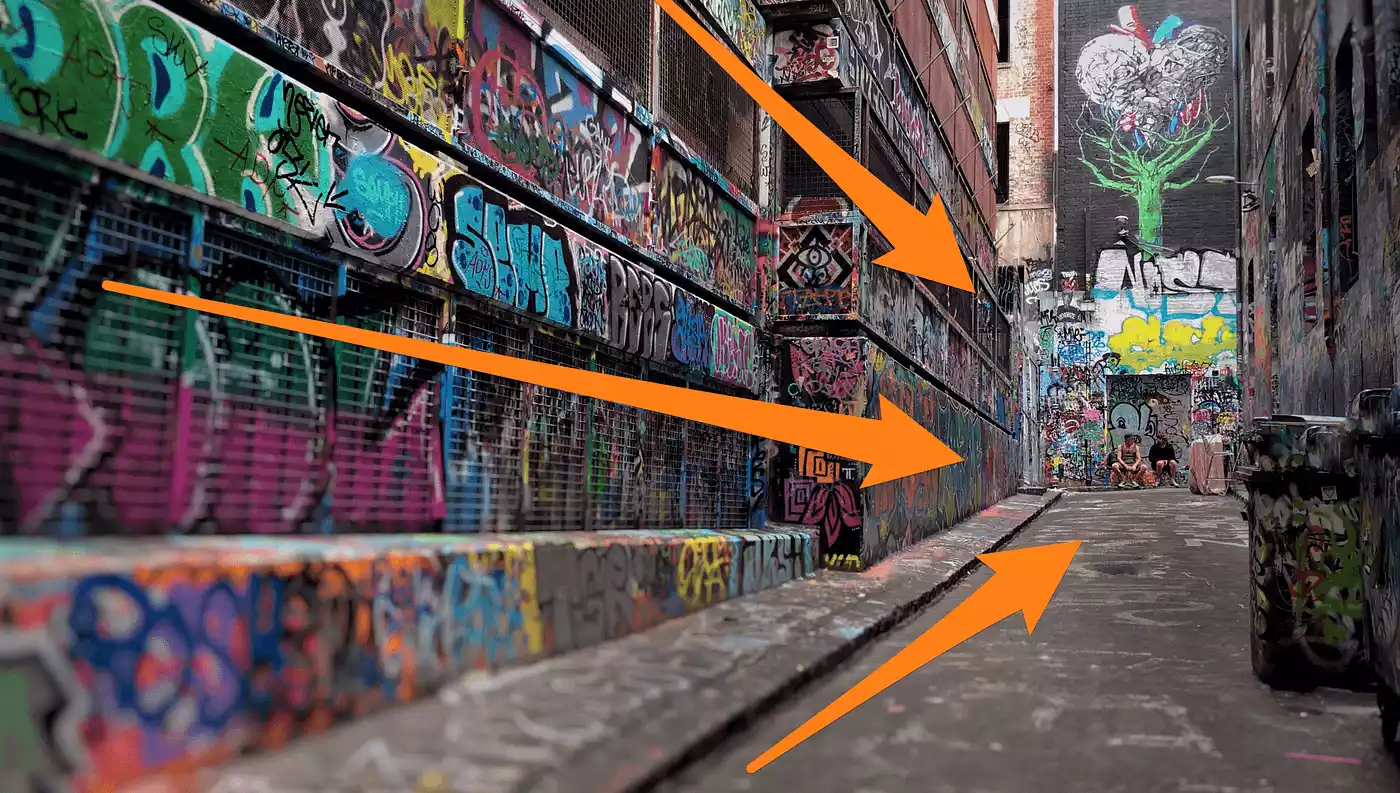
Wide-angle lenses are ideal for capturing large murals and expansive scenes. They allow you to get close to the artwork while still fitting the entire piece into the frame. This type of lens is particularly useful in narrow alleyways or crowded urban environments.
Prime Lenses
Prime lenses, with their fixed focal lengths, offer superior image quality and are often faster than zoom lenses. They are excellent for capturing details and textures in graffiti art. A 35mm or 50mm prime lens can be a versatile choice for graffiti photography.
Lighting Conditions
Natural Light
Natural light can enhance the colors and textures of graffiti. Shooting during the golden hour, just after sunrise or before sunset, can add a warm glow to your photos. Overcast days can also be beneficial, as the diffused light reduces harsh shadows.
Artificial Light
Artificial light sources, such as street lamps or neon signs, can add a unique ambiance to your graffiti photos. Experimenting with different light sources can create dramatic effects and highlight specific elements of the artwork.
Composition Techniques

Rule of Thirds
The rule of thirds is a fundamental composition technique that can help create balanced and engaging photos. By dividing your frame into a 3×3 grid and placing the main elements of your graffiti photo along these lines or at their intersections, you can create a more dynamic image.
Leading Lines
Leading lines guide the viewer’s eye through the photo and can add depth to your graffiti shots. Look for natural lines in the environment, such as roads, fences, or building edges, that lead towards the graffiti.
Post-Processing Tips
Editing Software
Post-processing can enhance your graffiti photos and bring out the best in the artwork. Software like Adobe Lightroom or Photoshop offers powerful tools for adjusting exposure, contrast, and color balance.
Color Correction
Graffiti is often vibrant and colorful, so color correction is crucial. Adjusting the saturation and vibrance can make the colors pop, while fine-tuning the white balance ensures accurate color representation.
Common Mistakes to Avoid
Overexposure
Overexposure can wash out the colors and details in your graffiti photos. Always check your histogram and use exposure compensation if necessary to avoid blown-out highlights.
Ignoring Backgrounds
The background can either complement or distract from the graffiti. Pay attention to the surroundings and try to frame your shots in a way that enhances the artwork.
Advanced Techniques
HDR Photography
High Dynamic Range (HDR) photography involves taking multiple exposures of the same scene and blending them together. This technique can capture a wider range of light and detail, making it ideal for graffiti photography in challenging lighting conditions.
Long Exposure
Long exposure photography can create stunning effects, such as light trails or smooth water. This technique requires a tripod and a slow shutter speed, and it can add a creative touch to your graffiti photos.
Equipment Recommendations
Best Cameras for Graffiti Photography
• Canon EOS R5: Known for its high resolution and excellent low-light performance.
• Nikon Z6 II: Offers great dynamic range and fast autofocus.
• Sony A7 III: A versatile mirrorless camera with impressive image quality.
Essential Accessories
• Tripod: For stability during long exposures.
• Lens Filters: To control reflections and enhance colors.
• Extra Batteries: Graffiti photography can be time-consuming, so having spare batteries is essential.
Safety Tips
Legal Considerations
Always be aware of the legal implications of photographing graffiti. Some locations may have restrictions, and it’s important to respect private property and local laws.
Personal Safety
Graffiti is often found in urban areas that may not always be safe. Always be aware of your surroundings, avoid going alone at night, and keep your equipment secure.
Inspiration and Creativity
Famous Graffiti Photographers
• Martha Cooper: Known for documenting the early days of graffiti in New York City.
• Henry Chalfant: Renowned for his work capturing subway graffiti.
Finding Unique Angles
Experiment with different perspectives to find unique angles. Climb to higher vantage points, shoot from ground level, or use reflections to add interest to your photos.
FAQs
What are the best camera settings for graffiti photography?
The best camera settings for graffiti photography depend on the lighting conditions and the effect you want to achieve. Generally, a wide aperture (f/2.8 to f/5.6) helps isolate the artwork from the background. A fast shutter speed (1/250s or faster) is ideal for freezing motion, while a lower ISO (100-400) ensures minimal noise. However, these settings can vary based on the specific scene and lighting.
How do I choose the right lens for graffiti photography?
Choosing the right lens for graffiti photography depends on the type of shots you want to capture. Wide-angle lenses (10-24mm) are great for capturing large murals and expansive scenes. Prime lenses (35mm or 50mm) offer superior image quality and are excellent for capturing details and textures. Consider the environment and the size of the graffiti when selecting your lens.
What lighting conditions are best for graffiti photography?
Natural light is often the best for graffiti photography, especially during the golden hour (just after sunrise or before sunset) when the light is soft and warm. Overcast days provide diffused light, reducing harsh shadows. Artificial light sources, such as street lamps or neon signs, can add a unique ambiance to your photos. Experiment with different lighting conditions to see what works best for your style.
How can I improve my composition in graffiti photography?
Improving composition in graffiti photography involves using techniques like the rule of thirds and leading lines. The rule of thirds helps create balanced and engaging photos by placing the main elements along the grid lines. Leading lines guide the viewer’s eye through the photo and add depth. Pay attention to the background and try to frame your shots in a way that enhances the artwork.
What are some common mistakes to avoid in graffiti photography?
Common mistakes in graffiti photography include overexposure, which can wash out colors and details, and ignoring the background, which can distract from the artwork. Always check your histogram to avoid blown-out highlights and pay attention to the surroundings to ensure they complement the graffiti. Additionally, avoid using a high ISO in bright conditions to prevent noise in your images.
Conclusion
Mastering the best camera settings for graffiti photography involves understanding the interplay of aperture, shutter speed, and ISO, as well as choosing the right lens and lighting conditions. By avoiding common mistakes and experimenting with advanced techniques, you can capture stunning images that showcase the vibrant and dynamic world of graffiti. Remember to stay safe, respect legal considerations, and let your creativity shine through your photos.
—
Sources:
– “The Best Camera Settings for Street Photography” – Digital Photography School
– “How to Photograph Graffiti” – Expert Photography
– “Street Photography Tips for Beginners” – Photography Life
What’s The Best Camera for Street Photography?
Ruth Aquilani is a renowned graffiti artist known for her bold, colorful, and expressive style. She began her career as a street artist in the early 2000s, quickly making a name for herself in the graffiti community with her unique and striking works of art.

[…] the 20th century, graffiti gained prominence in urban settings, particularly in New York City during the 1970s. The rise of hip-hop culture played a pivotal role […]